Benchmark Media Systems DAC1 D/A Converter and ADC1
A/D Converter
DAC1
ADC1
|
A few months ago I got an e-mail asking if
I’d like to review Benchmark Media Systems’ new analog-to-digital converter, the
ADC1. I’m always interested to try new things, and I’d been looking for an
excuse to digitize some old LPs, so I agreed. When I got word that Benchmark would also
send along their highly regarded digital-to-analog converter, the DAC1, I was very happy.
Many people I respect had lauded the DAC1, and I was interested to hear it in my home.
Many reviews of the DAC1 had mentioned its headphone amplifier but had said little about
it. Being an avid headphone listener, I wanted to see how well the DAC1 would stand up
against my usual headphone amplifiers.
Since then, months have passed during which I’ve used
both the DAC1 and ADC1, and I can say with confidence that Benchmark’s reputation is
well deserved. The three most important elements of any product -- build quality, sound
quality, and customer support -- are all present in their designs.
Description
The ADC1 ($1775 USD) and DAC1 ($975) are built on identical
small chassis measuring 9.5"W by 1.725"H by 8.5"D, and each weighs 3.5
pounds. The faceplates and bodies of both are black and have holes for rack mounting.
Benchmark’s website now offers a silver version of the DAC1 without rack-mounting
holes -- I haven’t see one in person, but it looks chic and décor-friendly.
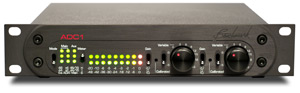
Starting with the ADC1: On the left side of its front panel
is the Mode switch, which you can use to synchronize the ADC1 with an external word clock
or to select the sample frequency for the main and auxiliary outputs. Next to that is a
bank of nine LEDs that tell you which sampling setting you’ve selected. The
instruction manual spells out the meaning of these LEDs in detail, but it’s easy
enough to figure out what each represents if you look at the small numbers printed below
it. The ADC1 lets you choose among sampling frequencies of 44.1kHz, 48kHz, 88.2kHz, 96kHz,
176.4kHz, and 192kHz. The auxiliary output can be set to mimic the main output, or to
16-bit/44.1kHz or 16-bit/48kHz, which would allow the signal to be sent, for example, to a
standard CD or MiniDisc recorder.
Next up are a Meter switch and two rows of nine LEDs each,
which function as the meter display. The switch allows you to set the scale for the meter
display between three settings. The meter measures the data after they have been converted
from an analog signal, and tells you whether clipping has occurred for as little as a
single digital sample. The front panel ends with two sets of controls, each comprising a
dial and two switches. Each pair of switches is used to set the input gain. The first
switch in each pair sets the first stage gain, and can be set at 0dB, +10dB, or +20dB. The
second switch and the dial control the second stage gain, which has so many settings that
it’s probably easier for those interested to read the manual.
The ADC1’s rear panel is just as full of features as
the front. On the left side are two balanced inputs for an analog line. Then come four
digital outputs: two coaxial digital (one each for the main and auxiliary outputs), an
optical, and an AES/EBU digital. These are followed by two clock-related connections: an
input for an external word clock, and an output for sending the clock signal to your
recorder. Finally, there is a receptacle for the power cord. The ADC1’s rear panel is
a masterfully economic use of space.
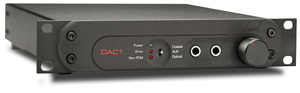
At the left of the DAC1’s front panel is a column of
three LEDs: the top, blue light indicates that the unit is receiving power; next down is a
red light that will glow if there’s an error in the signal or no signal is present;
and on the bottom is a red light that will alert you if the unit is receiving a non-PCM
signal. Next up is a switch to choose among the DAC1’s three inputs: coaxial, XLR,
and optical. To the right of these are two headphone inputs, followed at last by the
volume knob.
The left side of the DAC1’s rear panel has pairs of
RCA and balanced outputs, as well as a switch that allows the user to switch the output
from a line-level signal unaffected by the front volume knob to a signal that can be
controlled with that knob. Farther along to the right are three digital inputs (coaxial,
optical, AES/ESU) and the receptacle for the power cord.
From analog to digital . . .
When I unpacked the Benchmark ADC1, I was overwhelmed. The
DAC1’s functions are intuitive and easy to master, but my lack of experience with
truly high-quality recording devices meant that I had to sit down and read the ADC1’s
instruction manual. But at first glance, even the manual, though well-written and repaying
careful reading, was more than I was ready for. Luckily, Benchmark also includes a
"Quickstart Guide" that gave me all the information I needed to start
immediately. After I understood how to operate the ADC1, I realized that using it to
digitize old LPs was like buying a Ferrari to take the kids to school and do the grocery
shopping: you can do it, but you’re not using the tool to its fullest capacity.
When I realized just how powerful a recording tool the ADC1
is, I e-mailed a musician I know, hoping we could arrange a little recording session using
the ADC1 for some A/D conversion to really put the Benchmark through its paces. Everything
was going along great until I tried to set up the final date and found he’d gone off
on a tour of Europe without telling me. Back to my original plan of digitizing LPs.
Because I thought getting into the groove (so to speak) of
digitizing LPs with the ADC1 might take some time, I decided to first try recording from
my Sirius satellite radio receiver. I reasoned that the signal from the radio would let me
play with the setup of the ADC1 for more than the 22 minutes or so I’d get from an LP
side. Because the ADC1 has only balanced inputs, I had to use RCA/XLR adapters to get my
sources to connect to it. I also connected the ADC1’s auxiliary output to the DAC1 so
that I could monitor the signal. At first there was some static in the left channel; after
much experimentation, I determined that, for some reason, the problem seemed to be caused
by the XLR adapter. I switched the adapters and the static disappeared.
To use the ADC1, you’ll need somewhere to store the
digital files you create with it. This could be a standalone hard-disk recorder such as
those made by many pro audio companies; or you can use your computer, if its soundcard has
a digital input. At least a couple of easily available models from Creative have this
feature, though the highest signal they’ll accept is 24-bit/96kHz. A computer,
however, will add a number of variables that might affect the sound quality. You’ll
still be getting the digital signal from the ADC1, but the quality of your software and
hardware, such as your CD writer (if you plan to store the files on CD-Rs), could cause
you to hear less than the ADC1 has to offer.
For this reason, I connected the ADC1 to the DAC1 and
compared the resulting sound with the analog original. I was always impressed with the
digitized signal’s fidelity to the original. The digital rig produced copies that
sounded extremely close to the original, while seeming to enhance the separation of
instruments and sounding, perhaps, a tad brighter. This characteristic was not limited to
LP reproduction; when I used the Sirius receiver, the added brightness was not as
noticeable, but voices and instruments did seem more distinct from each other.
Reading the manual and playing around with the ADC1 was a
lot of fun, but I discovered that I’m not nearly as committed to digitizing my LP
collection as I thought I’d be. For the amount of time and effort involved in
transferring an LP to a digital file, I’d rather just buy the CD edition and be done
with it. As for the goodly proportion of my LPs that aren’t available on CD,
I’ll stick to listening to them at home.
This shouldn’t reflect poorly on Benchmark. The ADC1
is exemplary and easy to use. If I were a musician looking to set up a home recording
studio, I’d want an ADC1 on hand. But I’m a casual recorder, and it’s much
more than I would ever need or use. I have no personal experience with the Alesis
Masterlink, which combines a hard-disk recorder and CD burner, but it’s widely
available for just under $800 and might be a better fit for many GoodSound!
readers. And if the Alesis doesn’t offer the sound quality you demand, connect it to
a Benchmark DAC1.
. . . and from digital to analog
The Benchmark DAC1 has three functions: it’s a D/A
converter with balanced and unbalanced outputs, a headphone amplifier with two outputs,
and a digital preamplifier. I inserted the DAC1 into a system comprising a Rotel RCD-1070
CD player used as a transport, a Rogue Audio Tempest II integrated amplifier, and Quad 21L
loudspeakers. Interconnects and speaker cables were all by Analysis Plus, and the digital
cable was a DH Labs Silver Sonic D-75 coaxial. I used the adapter supplied by Benchmark to
connect this cable to the DAC1’s coaxial input because it used a BNC connection.
Benchmark’s literature makes much of their UltraLock
technology, which reportedly suppresses the jitter-related problems that are a concern
when using D/A converters. UltraLock should make the choice of transport and digital cable
much less important, but I didn’t always find this to be the case. The DAC1’s
performance with an optical cable and a Sony SCD-CE775 SACD player was markedly worse than
with the DH Labs Silver Sonic D-75 coaxial and a Rotel RCD-1070 CD player. The combo of
Sony and optical cable resulted in a much brighter sound that could even be called harsh.
The Rotel-coaxial combination, however, gave a very smooth, detailed presentation.
On "Don’t Think Twice, It’s All Right,"
from The Freewheelin’ Bob Dylan [SACD, Columbia CH 90321], the guitar had just
the right tone, the imaging was rock solid, and Dylan’s voice sounded close to what
I’ve heard from a very good (and expensive) vinyl system. On Kruder &
Dorfmeister’s The K&D Sessions [CD, K7 073], the bass was deep and
controlled and the whole presentation was nicely analytical. I felt I was hearing
everything these recordings had to offer.
In comparison to the Rotel RCD-1070, which I use regularly,
the DAC1 was clearly better, but not so much better that I felt shortchanged when
listening to the Rotel. The most noticeable difference was how eerily quiet and clean the
Benchmark was. I would never have called the Rotel player "harsh," but that was
the best way to describe it as compared with the Benchmark. This was especially noticeable
with lower frequencies: the bass on the Gorillaz’ Demon Days [CD, EMI 8 73838
2] went from deep and controlled with the Benchmark to slightly muddied with the Rotel.
To test the DAC1’s headphone output, I used a pair of
Grado SR-60 headphones and a pair of Etymotic ER-4P in-ear monitors. The Benchmark’s
volume control permitted listening at very low levels -- something not all headphone
amplifiers can do. With other amps, the signal sometimes jumps suddenly from too low to
too high. That wasn’t the case here. The sound through the DAC1’s headphone amp
was similar to that through its analog outputs, and should serve most people well. Still,
it was a little dry when I listened for long periods of time, and lacked the warmth
available from, say, HeadRoom’s Desktop Millett Hybrid amplifier. But that amp costs
more than $600 and doesn’t offer D/A conversion.
To use the DAC1 as a preamplifier, I bypassed the preamp
section of my Rogue Audio Tempest II integrated amp so that it operated as a power amp. I
then flipped the appropriate switches on the DAC1 and was ready to go. Benchmark’s
literature states that using the DAC1 as the preamplifier often gives the best results and
allows the DAC1 to really shine. The DAC1 did, indeed, continue to shine, but I
didn’t find it an improvement over using it simply as a source. With the Tempest
II’s preamp out of the loop, the music lost soundstage depth but retained the clear,
smooth sound I’d come to expect from the DAC1. If you have only digital sources and a
tight budget, I can see how using the DAC1 as a preamplifier would be welcome -- but I
didn’t feel its performance was degraded when not used in this way.
Conclusions
Using the Benchmark ADC1 and DAC1 was easy and fun. Each
has multiple functions that allow users to tailor the products’ uses to many
applications. The ADC1 is the most powerful recording tool I’ve ever used, and is
probably overkill for the casual recorder. But if you have a serious vinyl collection to
archive, or are setting up a small digital recording studio, it should flawlessly perform
to high standards. The DAC1 will have a wider audience and can serve many functions:
headphone amp, digital preamp, and, of course, D/A processing. In fact, I like it so much
that it’s the first product I’ve had for review that I’m considering
purchasing. My only reservation is whether to spend lots more money on a universal player
that plays CD, SACD, DVD-Video, and DVD-Audio.
Neither the ADC1 nor the DAC 1 is inexpensive, but if
you’re in the market for these types of products, Benchmark Media Systems’
reputation for quality will ensure that you’ll be able to use them for a long time to
come while getting best-in-class performance. Benchmark’s trial period allows you to
compare their products with your current gear, but have your checkbook ready -- you
probably won’t want to send them back.
...Eric Hetherington
Prices of equipment reviewed
|